2010-11-12

NXT Remote Control

Two of my favorite toys right now are my Lego Mindstorms set and my Android phone. And thanks to the Bluetooth protocol I've found a way to combine them. Behold!


Since the video is quite blurry, here's a better view of the application's interface:


The third control scheme (not pictured), which I like to call the tank mode, allows you to control each motor separately and works best if your phone has true multitouch support (not just pinch-to-zoom).

Now I'm not saying my application is very unique, there are at least two others on the Android Market that do the same, including an official one from Lego. But hey, it's mine!

If you'd like to try it, below is a QR code that you can scan from your phone (or if you're reading this on your phone, just tap the code). And here's the application's AppBrain page. (It's free of course.)


Finally if you'd like to see the source code, it's over here at Google Code.

2010-10-23

Paper clip spinning top

Today I'm going to show you how to make a spinning top from a paper clip. If you have a three year old niece or nephew, this is a trick you must learn.


You're going to need a paper clip and a pair of pliers. Also some cylindrical object is helpful, but not strictly necessary (I used a screwdriver handle). The paper clip can be any size, I used the bigger kind for demonstration, but the smaller ones work, too.


Supposedly the angle between the spokes must be 53 degrees for the center of gravity to be on the axis, but in my experience any roughly pac-man-like shape works. With a bit of tweaking you should get a top that spins for at least 30 seconds on a reasonably smooth surface.

2010-10-10

Panoramic Quake 3

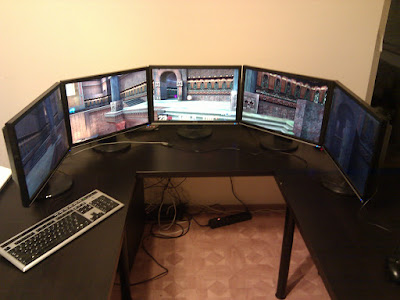
Running Google Earth on five screens is pretty cool, but we all know that the real test for any computer system is whether it can run Quake. Today I'm going to show you how to run Quake III Arena in a panoramic multiple screen configuration. Here's what my setup looks like:


And here's a video of me playing with some bots:


How do you make it work like that?

It turns out that it's actually easier than it seems, as Quake 3 already includes the view synchronization functionality, because it's needed for spectators. The only thing that we need in addition to that is a way to rotate the view a little to the left or to the right. This simple patch does exactly that, introducing a new console variable named cg_yawOffset.

You're going to need:
  1. five monitors and five computers (or some other number)
  2. a working copy of ioquake3 on each of them
  3. my mod
(Technically, you don't need a separate machine for each screen, you could drive two or more screens from the same computer if you figure out how to make one instance of Quake 3 run in fullscreen on one monitor and another one on the other. Also, there's nothing ioquake3-specific about my mod, it's just that I used ioquake3 to compile it, so it uses the new QVM format, which doesn't work with vanilla Quake 3. If you want to make it work with vanilla Quake 3, you'll have to take my patch and compile it yourself.)

Unzip my mod and put the galaxy directory in your ioquake3 directory (it has to be on the same level as the baseq3 directory). Do it on every computer. The mod consists of QVM files and not native code, so it's platform independent and can't hurt your computer, so don't worry.

For simplicity I'm going to assume that you're going to play using the computer connected to the screen in the center, even though it doesn't have to be that way. The server is also going to run on it. On that computer, run ioquake3 with the following command line parameters:

+set fs_game galaxy +set sv_pure 0 +devmap q3dm7

(You can use some other map if you like.)

On the rest of the machines, just run ioquake3 as you normally would. Then connect to the server, either by typing \connect server_ip in the console (you'll have to know the server's IP address) or from the menu. Then become a spectator, by typing \team s in the console or from the menu (press Esc, choose start, then spectate). Then click the left mouse button (or whatever you have bound to +attack) until you're following the player from the master computer (center screen). All your screens should now be displaying the same view.

Time for the real magic. On each computer, type \cg_fov 45 in the console to set the field of view (use a number that matches the geometry of your setup, 45 degrees is what I used). Then on the first computer to the left of the master, type \cg_yawOffset 45. That will rotate the view 45 degrees to the left (if you used something other than 45 degrees for the FOV, use the same number here). On the second computer to the left, type \cg_yawOffset 90 and on the computers to the right, type \cg_yawOffset -45 and \cg_yawOffset -90. You should now have a nice panoramic Quake 3 configuration. Move around and see if everything works as it should.

You'll also want to disable the gun and the HUD on all screens except the master. To do that, type \cg_drawGun 0 and \cg_draw2D 0 in the console.

Oh, and by the way, if you don't have the full version of Quake 3, all of this works fine with the pak0.pk3 from the demo.

2010-10-01

My ghetto Liquid Galaxy setup

Yesterday Google has published instructions on how to recreate their Liquid Galaxy immersive environment for Google Earth. Naturally I had to try it immediately. Unfortunately I don't have access to eight 55-inch monitors, so my setup is not quite as impressive as Google's, but still very neat:


Here it is in action:


2010-08-20

Line Following Robot

Everyone with a Lego Mindstorms set must at some point build a line following robot. Here's mine.


The trick to following a line when all you have is one light sensor is that you don't follow the line, you follow the line's right (or left) edge. You try to stay exactly on the border between the dark area and the light area. The light sensor reports shades of gray when it passes from black to white. You choose a value that you think corresponds to the edge and then when the sensor reports a value brighter than the threshold value, you turn left, and when it reports a value darker than the threshold value, you turn right (assuming you chose to follow the right edge of a black line).


For smooth movement we don't just turn left when the value from the sensor is greater than the chosen threshold. Since the data we get is not binary, we can make the robot turn sharper when we think it's off the line entirely and only adjust its course slightly when we think it has left the edge of the line, but by just a little.


Here's the NXC program that the robot is running. It's heavily inspired by the NXT-G program of this robot. I initially used OnFwdSync(OUT_BC, ...) to turn the robot, but it sometimes resulted in very jerky movement. When trying to figure out whether it's a problem with my hardware or software I looked at that robot's program and saw that they control each motor independently. When I replaced calls to OnFwdSync(OUT_BC, ...) with OutFwd(OUT_B, ...) and OutFwd(OUT_C, ...) (with power values based on whether we think we should be turning right or left), the jerkiness problem was solved.

I also used their idea of calibrating the sensor at the beginning (the robot rotates a bit to the left and then to the right, noting the maximum and minimum light levels and chooses the threshold value as the average of the two).


You will note that I used a faster version of the program for the NXT Test Pad and a slower version for following the line that I made on the floor with electrical tape. I had to do this because the robot kept losing the line (probably because the tape was too narrow, it was also blue, not black, and some of the turns I made may have been too sharp).

2010-08-17

Music Tape Player

My second NXT creation is a music player that uses the color sensor to read notes from tape.


The notes are encoded using colors. I considered using shades of gray and then using the color sensor in light level mode to read them, but that would require calibration (as the readouts would be dependent on current light conditions in the room) and possibly wouldn't allow for more than 5 or 6 well-distinguishable levels anyway.


Here's the NXC program that the device is running. As you can see it constantly reads the color sensor and adjusts the sound accordingly. Another way of doing this would be to only read the color at certain intervals, which would eliminate the problem that sometimes occurs when the color sensor gets confused during the transition between one color and another. But the current approach has the nice feature that we can have notes of arbitrary lengths (by simply putting a wider or less wide stripe of color on the tape). It also doesn't require any synchronization.


Possible improvements might include:

  • an encoding scheme that would allow for more than five notes
  • a mechanism for stopping the tape at the end
  • a rewinding mechanism
  • a better tune for demonstration

2010-08-12

Sonar

This is my first Mindstorms robot. It rotates around the vertical axis while gathering data from the ultrasonic sensor. Every time it makes a full circle it plots the gathered data on the display. The results are mixed.


Can you guess what the red ball is for?


OK, so the red ball is there so that the robot knows it made a full circle. You can see that the color sensor rotates with the rest of the robot while the ball remains still.


Here's the source code for the program that the robot is running.

Hello

Yeah, hi. This is my blog.